Showing posts with label Tutorial. Show all posts

Friday, January 27, 2017

Tutorial Finished and In Store


I have a few tutorials in the works, but really happy to get this one finished. I tried a number of times to load it up to Etsy, but it would not take it because the file was to big. I put lots of pictures in my tutorials and I guess I went a little over board. Today I compressed the file and it worked. These little primitive angels are so much fun to make. They are made of coffee stained coffee filters and that makes them creamy wonderful! Keep them plain or add a little lace and a few pearls. 

Wednesday, November 25, 2015

Fall Fairy Wands

It all started with a stick. We wrapped the stick with raffia. No glue is needed to make these , but I did use tacky glue when I thought it was needed,but you could use hot glue. These can be made outside with leaves, flowers, grasses and raffia. Lilly loves wands, so we will be making them in all shapes and sizes


To make this one I am using dried sunflower leaves, but any type of leaves could be used


  I tied  three leaves together with raffia and tied to stick


Then tied together little bunches of dried flowers and tied them to stick in between the leaves


then added a silk sunflower in the middle and tied on some extra raffia


Imagine!

Tuesday, January 17, 2012

How to make!

You might be surprised that the little flower sprig all started with the leaves. It started out with just wanting a vine of leaves for the fairy house I am working on. One thing leads to another and this is the end result.

                                                                                                                                                                                           IMG_5422

Monday, January 9, 2012

A simple beaded heart


IMG_5302 (683x1024)
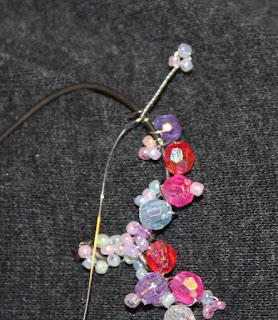
I just love hearts! I have a large window above my kitchen sink and I want to make lots of beaded hearts to hang for Valentines Day. I need to make many, so I needed them to be fairly simple and fast and this is what I came up with. While making them I thought of some other uses for them and will share that with you in a future post.


                                        18 gauge Dark Annealed Wire was used, but any 18 gauge will work
IMG_5261
Added single
beads
and wrapped
wire around heart and randomly
wrapped seed
beads also


 It was faster to do all the little clusters and then go back and add the larger beads.


Sunday, October 31, 2010

Trick or Treat


I really did not spend too much time decorating for Halloween this year, but I pulled out these little blackbird witches and placed them around my dishes and kept my little cup filled with candy corn and since I can't share my candy with you I thought another "How I Did It" might do for a treat.You will need a Styrofoam egg and a small round. You can make these any size you wish them to be. I just went to the craft store and played with the different sizes until I liked the look. I seemed to like the head to be very small in comparison to the body.
The beak is a diagonal cut from the stem of a black plastic rose and about an inch in length.

I used paper wrapped florist wire for the legs and broom handle and also cut a small piece to attach head to body. Put glue on wire and insert wire into head and body.
insert beak to make a hole and position, but do not glue just yet.
Tear your strips of fabric as small a width as you can. I was able to tear my strips a little under 1/2 inch.
Take the beak out and fill the hole with a little Fabric Tac. Tie a strip of your fabric around the beak and place beak back in the hole. Hold in place for a few minutes and then add a little Fabric Tac around the beak and face area and just start wrapping.I did use the glue to hold the strip in place around the face, but once you get to wrapping your strip around the bird, you will only need to use glue at the beginning and end of each strip.

Glue a little rhinestone on for an eye.
Bend your wire like this to make the feet( I ended up painting the legs black ).
Add the legs to body. I used a pen to punch through the fabric to the Styrofoam and glue in place.
For the tail feathers grab a few strips of your fabric and tie a knot, cut and glue in place.

To make the hat. Form a cone out of a piece of paper. Glue and trim. When dry decide how tall you want the hat to be and cut off the bottom.
For the brim cut a circle out of the same paper and glue cone to circle. Add a little ribbon and Ta-da!

Glue hat on head.


Happy Halloween!

Saturday, November 28, 2009

Coffee Filter Stars Tutorial

It seems this Christmas season I am star struck. I wanted to share this tutorial so you can have as much fun making these as I am. I must warn you these are addictive. This is a great going green project and you can recycle your coffee filters. I am using new ones because I am making so many of them, but recycled are the best. The white coffee filters turn out that old vintage color we all love and if you do not drink coffee you can always use the natural coffee filters.This is such a fun and fast project.

About This Blog


Popular Posts

Labels